
Meritshot Tutorials
- Home
- »
- Accessing and Loading Databases
SQL Tutorial
-
SQL SyntaxSQL Syntax
-
SQL ORDER BY ClauseSQL ORDER BY Clause
-
Introduction to SQLIntroduction to SQL
-
SQL SELECT DISTINCTSQL SELECT DISTINCT
-
SQL Logical OperatorsSQL Logical Operators
-
SQL WHERE ClauseSQL WHERE Clause
-
SQL SELECT StatementSQL SELECT Statement
-
SQL DELETE StatementSQL DELETE Statement
-
SQL INSERT INTOSQL INSERT INTO
-
SQL Null ValuesSQL Null Values
-
SQL Update StatementSQL Update Statement
-
SQL Select TopSQL Select Top
-
SQL Aggregate FunctionsSQL Aggregate Functions
-
SQL LIKE and WildcardsSQL LIKE and Wildcards
-
SQL IN and SQL BETWEENSQL IN and SQL BETWEEN
-
SQL JOINSSQL JOINS
-
SQL Group BySQL Group By
-
SQL HavingSQL Having
-
SQL EXISTSSQL EXISTS
-
SQL SELECT INTOSQL SELECT INTO
-
SQL INSERT INTO SELECTSQL INSERT INTO SELECT
-
SQL CASE STATEMENTSQL CASE STATEMENT
-
SQL NULL FunctionsSQL NULL Functions
-
SQL Stored ProceduresSQL Stored Procedures
-
SQL User-Defined FunctionsSQL User-Defined Functions
-
SQL CommentsSQL Comments
-
SQL OperatorsSQL Operators
-
SQL Database Creation and ManagementSQL Database Creation and Management
-
SQL CREATE DATABASE StatementSQL CREATE DATABASE Statement
-
SQL CREATE TABLE StatementSQL CREATE TABLE Statement
-
SQL DROP DATABASE StatementSQL DROP DATABASE Statement
-
SQL DROP TABLE StatementSQL DROP TABLE Statement
-
SQL ALTER TABLE StatementSQL ALTER TABLE Statement
-
SQL NOT NULL ConstraintSQL NOT NULL Constraint
-
SQL UNIQUE ConstraintSQL UNIQUE Constraint
-
SQL PRIMARY KEY ConstraintSQL PRIMARY KEY Constraint
-
SQL FOREIGN KEY ConstraintSQL FOREIGN KEY Constraint
-
SQL CHECK ConstraintSQL CHECK Constraint
-
SQL DEFAULT ConstraintSQL DEFAULT Constraint
-
SQL IndexesSQL Indexes
-
SQL Date FunctionsSQL Date Functions
-
SQL ViewsSQL Views
-
SQL InjectionSQL Injection
-
SQL Data Types OverviewSQL Data Types Overview
-
SQL AUTO_INCREMENTSQL AUTO_INCREMENT
-
SQL Keywords ReferenceSQL Keywords Reference
-
Accessing and Loading DatabasesAccessing and Loading Databases
Accessing and Loading Databases and Performing Query Analysis in python
This section will guide you through connecting to databases, executing queries, handling transactions, and performing data analysis using Python. We will cover basics from setting up your environment to advanced query analysis with real-world examples.
5.1 Introduction to Database Connectivity in Python
Python provides several libraries that make it easy to connect to and interact with databases. Here’s a simple guide to some of the most commonly used libraries:
Overview of Python Database Libraries
1 SQLite
- What is SQLite?: SQLite is a lightweight, serverless database engine that’s built into Python. It’s great for small applications and development work because it doesn’t require a separate server to run. The database is stored as a file on your system.
- Why Use SQLite?: It’s easy to set up, doesn’t require installation, and is perfect for small to medium-sized projects or for learning purposes.
Example:
python code
import sqlite3
# Connect to an SQLite database (or create it if it doesn’t exist)
connection = sqlite3.connect(‘example.db’)
# Create a cursor object to interact with the database
cursor = connection.cursor()
# Create a table
cursor.execute(”’
CREATE TABLE IF NOT EXISTS Students (
StudentID INTEGER PRIMARY KEY,
Name TEXT,
Grade TEXT
)
”’)
# Insert data
cursor.execute(“INSERT INTO Students (Name, Grade) VALUES (‘Alice’, ‘A’)”)
connection.commit()
# Query data
cursor.execute(“SELECT * FROM Students”)
rows = cursor.fetchall()
for row in rows:
print(row)
# Close the connection
connection.close()
Output:
(1, ‘Alice’, ‘A’)
Explanation: This example creates a table in SQLite, inserts a record, retrieves and prints it. The example.db file stores your database.
2 MySQL Connector
- What is MySQL Connector?: This is a library that allows Python to connect to MySQL databases. MySQL is a popular relational database management system used for larger applications and web services.
- Why Use MySQL Connector?: Use it for applications where you need a more robust database with powerful features.
Example:
python code:
import mysql.connector
# Connect to a MySQL database
connection = mysql.connector.connect(
host=’localhost’,
user=’yourusername’,
password=’yourpassword’,
database=’yourdatabase’
)
# Create a cursor object
cursor = connection.cursor()
# Create a table
cursor.execute(”’
CREATE TABLE IF NOT EXISTS Students (
StudentID INT AUTO_INCREMENT PRIMARY KEY,
Name VARCHAR(100),
Grade VARCHAR(10)
)
”’)
# Insert data
cursor.execute(“INSERT INTO Students (Name, Grade) VALUES (‘Bob’, ‘B’)”)
connection.commit()
# Query data
cursor.execute(“SELECT * FROM Students”)
rows = cursor.fetchall()
for row in rows:
print(row)
# Close the connection
connection.close()
Output:
(1, ‘Bob’, ‘B’)
Explanation: This example connects to a MySQL database, creates a table, inserts a record, and retrieves it.
3 SQLAlchemy
- What is SQLAlchemy?: SQLAlchemy is a powerful library for Python that provides an ORM (Object-Relational Mapping) system. This means it allows you to use Python classes to interact with database tables, making database operations easier and more intuitive.
- Why Use SQLAlchemy?: It provides a high-level way to work with databases, allowing complex queries and database management tasks with ease.
Example:
Python code:
from sqlalchemy import create_engine, Column, Integer, String
from sqlalchemy.ext.declarative import declarative_base
from sqlalchemy.orm import sessionmaker
# Create an engine and base class
engine = create_engine(‘sqlite:///example.db’)
Base = declarative_base()
# Define a Student class
class Student(Base):
__tablename__ = ‘students’
id = Column(Integer, primary_key=True)
name = Column(String)
grade = Column(String)
# Create a table
Base.metadata.create_all(engine)
# Create a session
Session = sessionmaker(bind=engine)
session = Session()
# Insert data
new_student = Student(name=’Carol’, grade=’A’)
session.add(new_student)
session.commit()
# Query data
students = session.query(Student).all()
for student in students:
print(student.id, student.name, student.grade)
# Close the session
session.close()
Output:
1 Carol A
Explanation: This example uses SQLAlchemy to define a Student class, create a table, insert a record, and query it. SQLAlchemy abstracts the database interactions into Python objects, making it easier to work with complex queries and relationships.
These libraries offer different levels of complexity and functionality. SQLite is great for quick, simple projects; MySQL Connector is suited for more robust applications; SQLAlchemy provides a powerful and flexible ORM solution. Each library has its strengths, and the choice depends on your specific needs and the complexity of your application.
5.2 Setting Up the Environment
To start working with databases in Python, you need to install the right libraries. Here’s a step-by-step guide to get you set up:
Installing Necessary Libraries
- SQLite:
- What is SQLite?: SQLite is a lightweight database that’s built into Python. You don’t need to install anything extra for SQLite because it comes with Python by default.
- Example: Since SQLite is already included, you can start using it right away without any installation.
- MySQL Connector:
- What is MySQL Connector?: This library allows Python to connect to MySQL databases. You need to install it separately because it’s not included with Python.
- How to Install: Open your command line or terminal and type:
pip install mysql-connector-python
- Explanation: pip is a package manager for Python that helps you install libraries. By running the command above, you’re telling pip to download and install the MySQL Connector library.
Example:
After installation, you can use the MySQL Connector in your Python code to connect to a MySQL database:
Python code:
import mysql.connector
# Connect to a MySQL database
connection = mysql.connector.connect(
host=’localhost’,
user=’yourusername’,
password=’yourpassword’,
database=’yourdatabase’
)
# Create a cursor object
cursor = connection.cursor()
# Execute a query
cursor.execute(“SELECT VERSION()”)
# Fetch the result
result = cursor.fetchone()
print(“MySQL version:”, result)
# Close the connection
connection.close()
Output:
MySQL version: (‘8.0.21’,)
Explanation: This example connects to a MySQL database, runs a query to get the MySQL version, and prints it. Ensure that you replace ‘localhost’, ‘yourusername’, ‘yourpassword’, and ‘yourdatabase’ with your actual MySQL server details.
3 SQLAlchemy:
- What is SQLAlchemy?: SQLAlchemy is a library that provides a high-level way to interact with databases through Object-Relational Mapping (ORM). It supports multiple database systems and makes complex queries easier.
- How to Install: Open your command line or terminal and type:
pip install sqlalchemy
- Explanation: Installing SQLAlchemy with pip makes it available for you to use in your Python projects. It allows you to work with databases in a more Pythonic way.
Example:
After installation, you can use SQLAlchemy to connect to a database and perform operations:
Python code:
from sqlalchemy import create_engine
from sqlalchemy.ext.declarative import declarative_base
from sqlalchemy.orm import sessionmaker
# Create an engine for SQLite database
engine = create_engine(‘sqlite:///example.db’)
# Create a base class for our models
Base = declarative_base()
# Create a session
Session = sessionmaker(bind=engine)
session = Session()
# Example: Define a new table (model)
from sqlalchemy import Column, Integer, String
class Student(Base):
__tablename__ = ‘students’
id = Column(Integer, primary_key=True)
name = Column(String)
grade = Column(String)
# Create the table in the database
Base.metadata.create_all(engine)
# Add a new student
new_student = Student(name=’John’, grade=’B’)
session.add(new_student)
session.commit()
# Query the table
students = session.query(Student).all()
for student in students:
print(student.id, student.name, student.grade)
# Close the session
session.close()
Output:
1 John B
Explanation: This example shows how to use SQLAlchemy to create a SQLite database, define a table, insert data, and query the data. SQLAlchemy provides a more structured way to interact with databases compared to using raw SQL.
With these libraries installed, you can start working with databases in Python. SQLite is simple and easy for small projects, MySQL Connector is useful for MySQL databases, and SQLAlchemy offers advanced features and flexibility.
5.3 Connecting to Databases
Connecting to different databases in Python involves using specific libraries and providing connection details. Below are simple steps to connect to various types of databases:
Connecting to SQLite
SQLite is a self-contained, file-based database. You can easily connect to it using Python’s built-in sqlite3 library.
Example:
Python code:
import sqlite3
# Connect to an SQLite database (or create it if it doesn’t exist)
connection = sqlite3.connect(‘example.db’)
# Create a cursor object to interact with the database
cursor = connection.cursor()
# Example Query: Create a table
cursor.execute(”’CREATE TABLE IF NOT EXISTS students
(id INTEGER PRIMARY KEY, name TEXT, grade TEXT)”’)
# Example Query: Insert data
cursor.execute(“INSERT INTO students (name, grade) VALUES (‘John Doe’, ‘A’)”)
# Commit changes
connection.commit()
# Close the connection when done
connection.close()
Explanation:
- sqlite3.connect(‘example.db’): Connects to an SQLite database file named example.db. If it doesn’t exist, it will be created.
- cursor.execute(): Executes SQL commands like creating tables and inserting data.
- connection.commit(): Saves changes to the database.
- connection.close(): Closes the connection to free up resources.
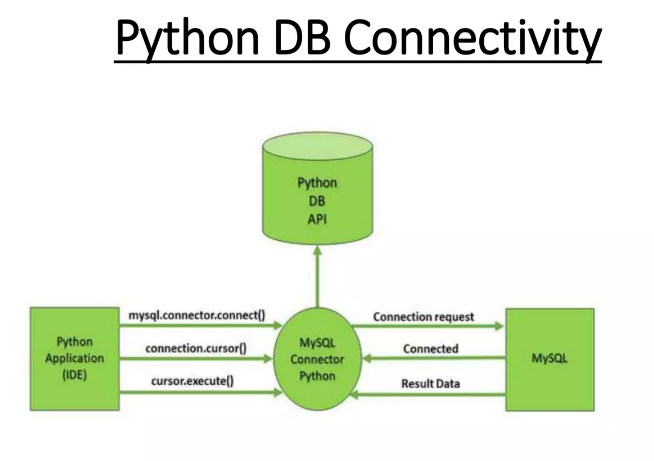
Connecting to MySQL
To connect to a MySQL database, use the mysql-connector-python library.
Example:
Python code:
import mysql.connector
# Connect to a MySQL database
connection = mysql.connector.connect(
host=’localhost’,
user=’yourusername’,
password=’yourpassword’,
database=’yourdatabase’
)
# Create a cursor object to interact with the database
cursor = connection.cursor()
# Example Query: Create a table
cursor.execute(”’CREATE TABLE IF NOT EXISTS students
(id INT AUTO_INCREMENT PRIMARY KEY, name VARCHAR(255), grade VARCHAR(10))”’)
# Example Query: Insert data
cursor.execute(“INSERT INTO students (name, grade) VALUES (‘Jane Doe’, ‘B’)”)
# Commit changes
connection.commit()
# Close the connection when done
connection.close()
Explanation:
- mysql.connector.connect(): Connects to a MySQL database using the provided host, user, password, and database.
- cursor.execute(): Executes SQL commands to interact with the database.
- connection.commit(): Saves changes to the database.
- connection.close(): Closes the connection.
Connecting to PostgreSQL
To connect to a PostgreSQL database, use the psycopg2 library.
Example:
Python code:
import psycopg2
# Connect to a PostgreSQL database
connection = psycopg2.connect(
host=’localhost’,
user=’yourusername’,
password=’yourpassword’,
dbname=’yourdatabase’
)
# Create a cursor object to interact with the database
cursor = connection.cursor()
# Example Query: Create a table
cursor.execute(”’CREATE TABLE IF NOT EXISTS students
(id SERIAL PRIMARY KEY, name VARCHAR(255), grade VARCHAR(10))”’)
# Example Query: Insert data
cursor.execute(“INSERT INTO students (name, grade) VALUES (‘Emily Smith’, ‘A’)”)
# Commit changes
connection.commit()
# Close the connection when done
connection.close()
Explanation:
- psycopg2.connect(): Connects to a PostgreSQL database with the given details.
- cursor.execute(): Executes SQL commands.
- connection.commit(): Applies changes.
- connection.close(): Closes the connection.
Connecting to SQL Server
To connect to a SQL Server database, use the pyodbc library.
Example:
Python code:
import pyodbc
# Connect to a SQL Server database
connection = pyodbc.connect(
‘DRIVER={ODBC Driver 17 for SQL Server};’
‘SERVER=yourserver;’
‘DATABASE=yourdatabase;’
‘UID=yourusername;’
‘PWD=yourpassword’
)
# Create a cursor object to interact with the database
cursor = connection.cursor()
# Example Query: Create a table
cursor.execute(”’CREATE TABLE students
(id INT PRIMARY KEY IDENTITY, name NVARCHAR(255), grade NVARCHAR(10))”’)
# Example Query: Insert data
cursor.execute(“INSERT INTO students (name, grade) VALUES (‘Michael Brown’, ‘B’)”)
# Commit changes
connection.commit()
# Close the connection when done
connection.close()
Explanation:
- pyodbc.connect(): Connects to SQL Server using an ODBC driver and provided connection details.
- cursor.execute(): Executes SQL commands.
- connection.commit(): Saves changes.
- connection.close(): Closes the connection.
These examples cover how to connect to different types of databases using Python, execute basic SQL commands, and handle connections. Adjust the connection details and SQL commands based on your specific requirements.
5.4 Executing Basic SQL Queries SELECT, INSERT, UPDATE, DELETE in Python
In Python, executing SQL queries allows you to interact with the database to retrieve, insert, update, or delete data. Let’s go through each of these operations step by step with easy-to-understand examples.
1 SELECT: Retrieving Data from a Database
The SELECT statement is used to fetch data from a database. You can retrieve all the rows from a table or filter specific data.
Example 1: Select specific columns
Python code:
cursor.execute(“SELECT Name, Grade FROM Students”) # Fetch only Name and Grade columns
rows = cursor.fetchall()
for row in rows:
print(row)
Output:
(‘John’, ‘A’)
(‘Alice’, ‘B’)
(‘Bob’, ‘A’)
Explanation: This query retrieves only the Name and Grade columns from the Students table.
Example 2: Select with a condition
Python code:
cursor.execute(“SELECT * FROM Students WHERE Grade = ‘A'”) # Fetch students with Grade ‘A’
rows = cursor.fetchall()
for row in rows:
print(row)
Output:
(‘John’, ‘A’)
(‘Bob’, ‘A’)
Explanation: This query fetches only the rows where the Grade is ‘A’.
Example 3: Select with ordering
Python code:
cursor.execute(“SELECT * FROM Students ORDER BY Name ASC”) # Fetch all rows ordered by Name alphabetically
rows = cursor.fetchall()
for row in rows:
print(row)
Output:
(‘Alice’, ‘B’)
(‘Bob’, ‘A’)
(‘John’, ‘A’)
Explanation: This query fetches all the data but orders the results by the Name column in ascending order.
2 INSERT: Adding New Data to a Database
The INSERT statement is used to add new records to a table.
You can insert data in different ways. Here are a few examples:
Example 1: Insert a single record
Python code:
cursor.execute(“INSERT INTO Students (Name, Grade) VALUES (‘Alice’, ‘B’)”)
connection.commit()
Explanation: This inserts a new student named Alice with a grade of ‘B’.
Example 2: Insert multiple records
Python code:
cursor.executemany(“INSERT INTO Students (Name, Grade) VALUES (%s, %s)”, [
(‘Eve’, ‘C’),
(‘Charlie’, ‘B’),
(‘David’, ‘A’)
])
connection.commit()
Explanation: This inserts multiple new records into the Students table at once.
Example 3: Insert data with a SELECT statement
Python code:
cursor.execute(“INSERT INTO HonorRoll (Name) SELECT Name FROM Students WHERE Grade = ‘A'”)
connection.commit()
Explanation: This inserts the names of students with grade ‘A’ into another table called HonorRoll.
3 UPDATE: Modifying Existing Data in a Database
The UPDATE statement allows you to modify existing records in a table.
You can update records in different ways. Here are a few examples:
Example 1: Update a single record
Python code:
cursor.execute(“UPDATE Students SET Grade = ‘C’ WHERE Name = ‘Alice'”)
connection.commit()
Explanation: This updates Alice’s grade to ‘C’.
Example 2: Update multiple records
Python code:
cursor.execute(“UPDATE Students SET Grade = ‘B’ WHERE Grade = ‘C'”)
connection.commit()
Explanation: This changes the grade of all students who currently have a ‘C’ to ‘B’.
Example 3: Update with a condition
Python code:
cursor.execute(“UPDATE Students SET Grade = ‘A’ WHERE Name LIKE ‘D%'”)
connection.commit()
Explanation: This updates the grade to ‘A’ for all students whose names start with the letter ‘D’.
4 DELETE: Removing Data from a Database
The DELETE statement is used to remove records from a table.
The DELETE statement can remove data in various ways. Here are a few examples:
Example 1: Delete a single record
Python code:
cursor.execute(“DELETE FROM Students WHERE Name = ‘Charlie'”)
connection.commit()
Explanation: This deletes the record for the student named Charlie.
Example 2: Delete multiple records
Python code:
cursor.execute(“DELETE FROM Students WHERE Grade = ‘B'”)
connection.commit()
Explanation: This deletes all records of students who have a grade of ‘B’.
Example 3: Delete all records from a table
Python code:
cursor.execute(“DELETE FROM Students”)
connection.commit()
Explanation: This deletes all the records from the Students table, leaving it empty.
These examples cover various ways to execute the basic SQL operations (SELECT, INSERT, UPDATE, DELETE) in Python, providing a practical understanding of how to interact with a database in different scenarios. By practicing these examples, you’ll develop a solid grasp of executing SQL queries in Python.
5.5 Fetching and Displaying Data
In this section, we’ll explore how to fetch and display data from a database using Python. We’ll cover how to fetch a single row, multiple rows, and load data into a Pandas DataFrame for more advanced analysis.
Fetching a Single Row
Fetching a single row from a database is useful when you’re only interested in the first result of your query. Here’s how you can do it:
Example:
python code:
# Execute the query to select all columns from the Students table
cursor.execute(“SELECT * FROM Students LIMIT 1”)
# Fetch the first row of the result set
row = cursor.fetchone()
# Print the fetched row
print(row)
Explanation:
- cursor.execute(): Executes the SQL query. In this case, we’re selecting all columns from the Students table but limiting the result to just one row.
- cursor.fetchone(): Fetches the first row from the result set.
- Output: The output will display a single row from the Students table, which could look something like this:
(1, ‘John Doe’, ‘A’)
Here, 1 is the StudentID, ‘John Doe’ is the Name, and ‘A’ is the Grade.
Fetching Multiple Rows
Sometimes, you may want to fetch more than one row but not the entire dataset. You can fetch a specific number of rows using the fetchmany() method.
Example:
Python code:
# Execute the query to select all columns from the Students table
cursor.execute(“SELECT * FROM Students”)
# Fetch the first 5 rows of the result set
rows = cursor.fetchmany(5)
# Loop through the fetched rows and print them
for row in rows:
print(row)
Explanation:
- cursor.fetchmany(5): Fetches the first 5 rows from the result set.
- Output: The output will display five rows from the Students table, such as:
(1, ‘John Doe’, ‘A’)
(2, ‘Jane Smith’, ‘B’)
(3, ‘Alice Johnson’, ‘A’)
(4, ‘Bob Brown’, ‘C’)
(5, ‘Charlie Davis’, ‘B’)
This method is useful when you want to process a few rows at a time instead of loading the entire result set into memory.
Fetching Data as a Pandas DataFrame
Pandas DataFrames offer a powerful way to analyze and manipulate data in Python. Here’s how to load data from a SQL query directly into a DataFrame:
Example:
Python code:
import pandas as pd
# Define the SQL query to select all columns from the Students table
query = “SELECT * FROM Students”
# Load the result set into a Pandas DataFrame
df = pd.read_sql_query(query, connection)
# Display the first few rows of the DataFrame
print(df.head())
Explanation:
- pd.read_sql_query(): Executes the SQL query and loads the result directly into a Pandas DataFrame.
- df.head(): Displays the first 5 rows of the DataFrame.
- Output: The output will look like a table, making it easy to view and analyze the data:
StudentID Name Grade
1 John Doe A
2 Jane Smith B
3 Alice Johnson A
4 Bob Brown C
5 Charlie Davis B
Using Pandas makes it easy to perform further analysis, like filtering, sorting, or visualizing the data, directly within Python.
5.6 Handling Database Transactions Commit and Rollback in Python
In Python, when you’re working with databases, it’s important to know how to manage transactions properly. Transactions are sequences of SQL operations executed as a single unit. If any part of the transaction fails, you can choose to cancel the entire transaction, preventing partial updates that could corrupt the database. This is where “Commit” and “Rollback” come into play.
Commit: Saving Changes
When you perform an operation like INSERT, UPDATE, or DELETE in a database, those changes are not permanently saved until you commit them. The commit() method in Python is used to save the changes made by your SQL commands.
Example 1: Committing an Insert Operation
Imagine you’re adding a new student to your Students table. After inserting the data, you need to commit the changes so that the new student is permanently added to the database.
Python code:
import sqlite3
# Connect to SQLite database
connection = sqlite3.connect(‘example.db’)
cursor = connection.cursor()
# Insert a new student
cursor.execute(“INSERT INTO Students (Name, Grade) VALUES (‘Emily’, ‘A’)”)
# Commit the changes to save them in the database
connection.commit()
# Close the connection
connection.close()
Explanation:
- The INSERT INTO statement adds a new row to the Students table.
- The commit() method ensures that the insertion is saved to the database.
Output:
- A new row with the name “Emily” and grade “A” is added to the Students table.
Example 2: Committing an Update Operation
If you need to update a student’s grade, you use an UPDATE statement. After the update, you commit the changes to make them permanent.
Python code:
import sqlite3
# Connect to SQLite database
connection = sqlite3.connect(‘example.db’)
cursor = connection.cursor()
# Update the grade of a student
cursor.execute(“UPDATE Students SET Grade = ‘B’ WHERE Name = ‘Emily'”)
# Commit the changes
connection.commit()
# Close the connection
connection.close()
Explanation:
- The UPDATE statement changes the grade of the student “Emily” to “B.”
- The commit() method saves this change permanently.
Output:
- The student’s grade in the Students table is updated to “B.”
Example 3: Committing a Delete Operation
If you want to delete a student from the table, you use the DELETE statement. After deleting, you commit the changes to remove the student permanently.
Python code:
import sqlite3
# Connect to SQLite database
connection = sqlite3.connect(‘example.db’)
cursor = connection.cursor()
# Delete a student
cursor.execute(“DELETE FROM Students WHERE Name = ‘Emily'”)
# Commit the changes
connection.commit()
# Close the connection
connection.close()
Explanation:
- The DELETE statement removes the student “Emily” from the Students table.
- The commit() method ensures that the deletion is saved.
Output:
- The row with the name “Emily” is removed from the Students table.
Rollback: Undoing Changes
If something goes wrong during a transaction, you might want to undo the changes made. The rollback() method in Python is used to reverse any changes made during the current transaction.
Example 1: Rolling Back an Insert Operation
Suppose you start inserting a new student, but an error occurs. You can rollback to undo the insertion.
Python code:
import sqlite3
# Connect to SQLite database
connection = sqlite3.connect(‘example.db’)
cursor = connection.cursor()
try:
# Attempt to insert a new student
cursor.execute(“INSERT INTO Students (Name, Grade) VALUES (‘John’, ‘C’)”)
# An error occurs (e.g., the connection is lost)
raise Exception(“An error occurred”)
# Commit the changes (this won’t be reached if an error occurs)
connection.commit()
except Exception as e:
# Rollback the transaction to undo changes
connection.rollback()
print(“Transaction failed:”, e)
finally:
# Close the connection
connection.close()
Explanation:
- The rollback() method undoes the INSERT operation if an error occurs, ensuring the database remains unchanged.
Output:
- The student “John” is not added to the Students table, and the database stays intact.
Example 2: Rolling Back an Update Operation
If you start updating a student’s grade but encounter an issue, you can rollback the update to revert the changes.
Python code:
import sqlite3
# Connect to SQLite database
connection = sqlite3.connect(‘example.db’)
cursor = connection.cursor()
try:
# Attempt to update a student’s grade
cursor.execute(“UPDATE Students SET Grade = ‘A’ WHERE Name = ‘John'”)
# Simulate an error
raise Exception(“An error occurred”)
# Commit the changes (this won’t be reached if an error occurs)
connection.commit()
except Exception as e:
# Rollback the transaction to undo changes
connection.rollback()
print(“Transaction failed:”, e)
finally:
# Close the connection
connection.close()
Explanation:
- The rollback() method undoes the UPDATE operation if an error occurs.
Output:
The student’s grade remains unchanged, as the update is rolled back.
Example 3: Rolling Back a Delete Operation
If you try to delete a student but something goes wrong, you can rollback to restore the student to the table.
Python code:
import sqlite3
# Connect to SQLite database
connection = sqlite3.connect(‘example.db’)
cursor = connection.cursor()
try:
# Attempt to delete a student
cursor.execute(“DELETE FROM Students WHERE Name = ‘John'”)
# Simulate an error
raise Exception(“An error occurred”)
# Commit the changes (this won’t be reached if an error occurs)
connection.commit()
except Exception as e:
# Rollback the transaction to undo changes
connection.rollback()
print(“Transaction failed:”, e)
finally:
# Close the connection
connection.close()
Explanation:
- The rollback() method undoes the DELETE operation if an error occurs.
Output:
- The student “John” is not removed from the Students table, as the deletion is rolled back.
These examples show how to use commit() and rollback() effectively in Python to manage database transactions. By understanding and using these methods, you can ensure your database remains consistent and reliable, even when errors occur.
5.7 Error Handling in Database Operations
Error handling is essential when working with databases because it ensures that your application can gracefully handle unexpected situations like invalid data, connectivity issues, or any other unforeseen errors. In Python, you can use try-except blocks to catch errors and handle them appropriately. This approach helps in maintaining data integrity and providing meaningful feedback when something goes wrong.
Basic Example of Error Handling with try-except
Let’s start with a basic example where we try to insert data into a table. If something goes wrong during the insertion, we’ll catch the error and roll back the transaction to ensure that the database remains in a consistent state.
Python code:
try:
# Attempt to insert data into the Students table
cursor.execute(“INSERT INTO Students (Name, Grade) VALUES (‘Amit’, ‘A’)”)
connection.commit() # Commit the transaction if successful
except Exception as e:
# If an error occurs, print the error message
print(“An error occurred:”, e)
connection.rollback() # Rollback the transaction to undo changes
Explanation:
- try block: Contains the code that might cause an error. In this case, it’s an INSERT operation into the Students table.
- except block: Catches any exceptions (errors) that occur in the try block. If an error is caught, it prints the error message and rolls back the transaction to revert any changes made.
Example 1: Handling an Insertion Error (Duplicate Entry)
Suppose you have a UNIQUE constraint on the Name field, and you try to insert a duplicate name:
Python code:
try:
# Attempt to insert a duplicate name into the Students table
cursor.execute(“INSERT INTO Students (Name, Grade) VALUES (‘Amit’, ‘A’)”)
connection.commit()
except Exception as e:
print(“An error occurred:”, e)
connection.rollback()
Output:
An error occurred: UNIQUE constraint failed: Students.Name
Explanation:
- If Amit already exists in the Students table, the UNIQUE constraint will cause an error, which is then caught by the except block.
- The transaction is rolled back, so no changes are made to the database.
Example 2: Handling a Connection Error
Imagine you try to execute a query when the database connection is lost:
Python code:
try:
# Simulating a lost connection
connection.close()
cursor.execute(“INSERT INTO Students (Name, Grade) VALUES (‘John’, ‘B’)”)
connection.commit()
except Exception as e:
print(“An error occurred:”, e)
Output:
An error occurred: Cannot operate on a closed database.
Explanation:
- If the connection is closed, any attempt to execute a query will raise an error, which is caught and displayed.
Example 3: Handling a Syntax Error
Consider a scenario where there’s a typo in the SQL statement:
Python code:
try:
# Typo in SQL query (misspelled ‘INSERT’ as ‘INSRT’)
cursor.execute(“INSRT INTO Students (Name, Grade) VALUES (‘Mike’, ‘C’)”)
connection.commit()
except Exception as e:
print(“An error occurred:”, e)
connection.rollback()
Output:
An error occurred: near “INSRT”: syntax error
Explanation:
- The SQL statement contains a typo, leading to a syntax error. The except block catches this error and rolls back the transaction.
Error handling in database operations is crucial for maintaining the integrity and reliability of your application. Using try-except blocks allows you to catch and respond to errors, ensuring that your application can handle issues gracefully without corrupting your database. By providing meaningful error messages and rolling back transactions when necessary, you can prevent potential data loss or inconsistencies.
5.8 Closing Database Connections
When you’re done interacting with a database in Python, it’s essential to close the connection. Closing the connection frees up resources that were allocated for the database session, ensuring that your application runs efficiently and avoids potential issues such as memory leaks or locked resources.
Why is Closing the Database Connection Important?
- Resource Management: Each open connection to a database consumes resources (like memory and CPU). If you don’t close connections, your application could eventually run out of resources, leading to performance issues or even crashes.
- Data Integrity: An open connection might lock certain resources or tables in the database. If not properly closed, this could prevent other operations from accessing those resources, potentially causing deadlocks or data corruption.
- Good Practice: Just as you wouldn’t leave a file open after reading it, you shouldn’t leave a database connection open after you’re done using it. It’s a good habit to close connections to ensure your code is clean, efficient, and error-free.
How to Close a Database Connection in Python
Closing a database connection in Python is simple. You use the close() method on the connection object. Here’s how you do it:
Example:
Python code:
# Close the database connection
connection.close()
Example 1: Basic Workflow with Connection Closing
Let’s look at a simple workflow where you connect to a database, execute a query, and then close the connection:
Python code:
import sqlite3
# Connect to an SQLite database
connection = sqlite3.connect(‘example.db’)
# Create a cursor object
cursor = connection.cursor()
# Execute a simple query
cursor.execute(“SELECT * FROM Students”)
# Fetch and print the results
rows = cursor.fetchall()
for row in rows:
print(row)
# Close the connection
connection.close()
Explanation:
- After fetching and printing the results, we close the connection using connection.close().
- This ensures that the database resources are properly released, and the application can continue to run smoothly.
Example 2: Closing Connection After an Insert Operation
Here’s another example where you perform an INSERT operation and then close the connection:
Python code:
import sqlite3
# Connect to an SQLite database
connection = sqlite3.connect(‘example.db’)
# Create a cursor object
cursor = connection.cursor()
# Insert a new record
cursor.execute(“INSERT INTO Students (Name, Grade) VALUES (‘Jane’, ‘A’)”)
connection.commit() # Save the changes
# Close the connection
connection.close()
Explanation:
- We insert a new student record into the Students table and commit the transaction to save the changes.
- After the operation is complete, we close the connection to free up resources.
Example 3: Closing Connection After Handling an Error
In this example, we handle an error and then close the connection, regardless of whether the operation was successful or not:
Python code:
import sqlite3
try:
# Connect to an SQLite database
connection = sqlite3.connect(‘example.db’)
cursor = connection.cursor()
# Attempt to insert a duplicate record (assuming Name is unique)
cursor.execute(“INSERT INTO Students (Name, Grade) VALUES (‘John’, ‘B’)”)
connection.commit() # Save the changes
except Exception as e:
print(“An error occurred:”, e)
connection.rollback() # Undo changes if there’s an error
finally:
# Close the connection in the finally block
connection.close()
Explanation:
- The try block attempts to insert a record, and if an error occurs, it’s caught in the except block.
- Whether an error occurs or not, the finally block ensures that the connection is always closed, which is a best practice.
Closing the database connection is a crucial step in working with databases in Python. It helps manage resources efficiently, ensures data integrity, and is a good coding practice. Always make sure to close the connection when you’re done with database operations, whether you’re performing a SELECT, INSERT, UPDATE, or any other SQL operation. By doing so, you ensure that your application runs smoothly and avoids potential issues down the line.